How to Use the ChatGPT API to Train an AI Chatbot with a Custom Knowledge Base
In a previous article, we showed how to create an AI chatbot using the ChatGPT API and give it a role to make it more unique. What if you want the AI to be trained using your own data? For instance, you might want to quickly search through a book, financial information, or a big collection of databases. In this article, we’ll show you how to use LangChain and the ChatGPT API to train an AI chatbot using your personal knowledge base. We are using OpenAI’s Large Language Model (LLM) to train the AI chatbot, together with LangChain, GPT Index, and other strong libraries. In light of that, let’s examine how to develop an AI chatbot using your own dataset.
Using the ChatGPT API, LangChain, and GPT Index, train an AI chatbot with a customised knowledge base.
We have provided a more thorough explanation on how to teach the AI chatbot using your own data in this article. We have provided all the instructions in an easy-to-understand language, from setting up the tools and software through training the AI model. It is strongly advised that you follow the directions from top to bottom without skipping a step.
Important Points to Consider Before Training AI on Your Own Data
On every operating system, including Windows, macOS, Linux, and ChromeOS, the AI chatbot can be trained. Although I’m using Windows 11 in this tutorial, the procedures are essentially the same on other systems.
The directions in the manual are laid out simply and are intended for general users. Therefore, even if you only know a little about computers and can’t code, you can quickly train and develop a Q&A AI chatbot. It would be more simpler to comprehend the procedure if you had read our prior essay on the ChatGPT bot.
It is advised to use a capable PC with a good CPU and GPU because we will be training an AI Chatbot using our own data. For testing purposes, though, you can use any inexpensive computer without any problems. I trained the AI model on a Chromebook using a 100-page (100MB) book. However, it’s strongly advised to use a powerful machine if you wish to train a large dataset with thousands of pages of data.
Finally, for the best results, the data set should be in English, while OpenAI claims that it will also function with widely used international languages like French, Spanish, German, etc. So go ahead and try it in your own tongue.
Create the Software Environment for an AI Chatbot Training
You should be aware, as in our previous article, that several libraries must also be installed in addition to Python and Pip. In order to make the setup procedure understandable for new users, we shall set up everything from scratch in this tutorial. We will install Python and Pip to give you a quick overview. Installing the Python libraries OpenAI, GPT Index, Gradio, and PyPDF2 will follow. You will discover what each library accomplishes along the way. Again, don’t worry about the installation procedure; it’s really simple. Let’s get started right away on that point.
1.Install Python : Installing Python (Pip) on your PC is the first step. Open this link to download the platform-specific setup file.
2. Run the setup file after that, making sure to tick the box to “Add Python.exe to PATH.” This is a crucial action to do. After that, click “Install Now” and carry through the standard Python installation procedures.
3.Launch the Terminal application on your computer to verify that Python is correctly installed. You can use Command Prompt instead of Windows Terminal, which I’m using. Run the command below to get the Python version once you’ve arrived. You might need to use python3 –version rather than python –version on Linux and macOS.
Upgrade Pip
Pip is simultaneously installed on your system when Python is. Upgrade it to the most recent version now. For those who don’t know, Pip is Python’s package manager. In essence, it enables you to install countless Python modules directly from the Terminal. OpenAI, gpt_index, Gradio, and PyPDF2 libraries can all be installed via Pip. The steps are listed below.
On your computer, launch the Terminal of your choosing. You can use Command Prompt instead of Windows Terminal, which I’m currently using. Run the command listed below to update Pip. On Linux and macOS, you might need to use pip3 and Python 3.
python -m pip install -U pip
Run the command below to see if Pip was correctly installed. The version number is output. If you encounter any failures, refer to our detailed instructions on installing Pip on Windows to resolve PATH-related problems.
pip --version
Install the libraries for OpenAI, GPT Index, PyPDF2, and Gradio.
It’s time to install the crucial libraries that will enable us to train an AI chatbot with a unique knowledge base once Python and Pip have been installed. The steps are listed below.
Run the command listed below to install the OpenAI library after opening the Terminal. It will serve as the large language model (LLM) that we train and develop for our AI chatbot. We’ll also import the OpenAI LangChain framework. It should be noted that pip3 may be required for Linux and macOS users instead of pip.
pip install openai
Let’s install GPT Index, also known as LlamaIndex, next. It enables the LLM to access the outside information that serves as our knowledge base. Here, we’re installing an earlier version of gpt_index that works with the code I’ve written below. This will guarantee that the code runs without encountering any issues. If you already installed gpt_index, running the command below again will replace the most recent installation.
pip install gpt_index==0.4.24
Install PyPDF2 after that in order to parse PDF files. This library will make it simple for the programme to read data that you feed it in PDF format. Run the command below to install PyCryptodome in addition. Again, this is done to prevent any parsing issues for PDF files.
pip install PyPDF2
pip install PyCryptodome
Install the Gradio library last. This is intended to create a straightforward user interface (UI) for the trained AI chatbot. As of right moment, all the libraries needed to train an AI chatbot have been installed.
pip install gradio
Download a Code Editor
To alter some of the code, we’ll need a code editor. I suggest Notepad++ for Windows (Download). Use the following link to simply download and install the programme. If you are familiar with powerful IDEs, you can utilise VS Code on any platform. On macOS and Linux, in addition to VS Code, Sublime Text (Download) can be installed.
You may change the code on ChromeOS by using the fantastic Caret app (Download). It’s time to obtain the OpenAI API key now that we have virtually finished configuring the software environment.
Receive a Free OpenAI API Key
We must now obtain an API key from OpenAI in order to train and build an AI chatbot based on a unique knowledge base. The API key enables you to analyse your custom data and make deductions using the OpenAI model as the LLM. OpenAI is currently giving new users free API keys and $5 in free credit for the first three months. You might get a free $18 credit in your account if you created your OpenAI account before. You will need to pay for the API access once the complimentary credit has run out. However, it is currently freely accessible to all users.
Create a free account at platform.openai.com/signup. Log in if you already have an OpenAI account.
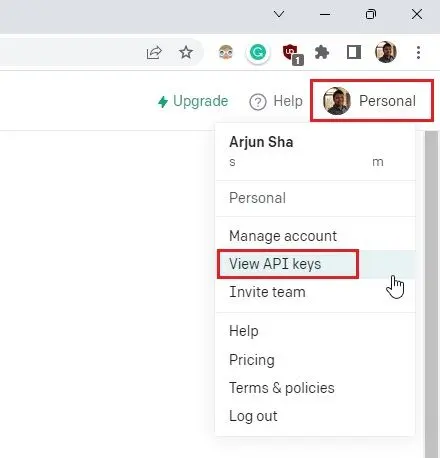
Next, pick “View API keys” from the drop-down menu by clicking on your profile in the top-right corner of the page.
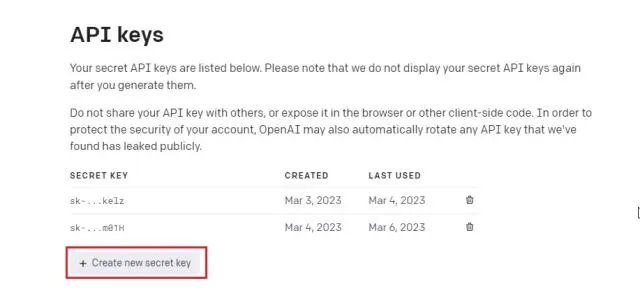
Click “Create new secret key” and then copy the API key from this page. Please be aware that you cannot later copy or read the complete API key. Therefore, it is highly advised to copy and paste the API key into a Notepad file right away.
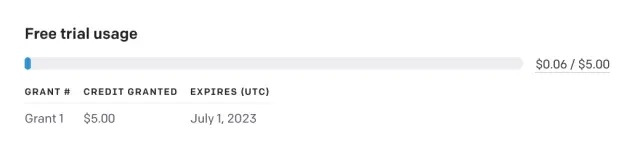
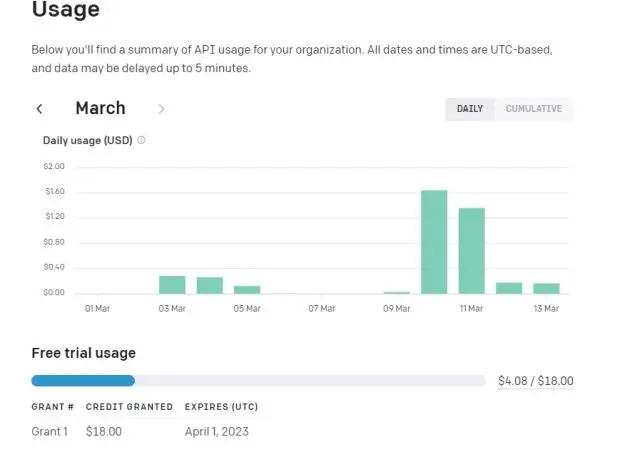
Visit platform.openai.com/account/usage next to see if you still have enough credit. You can purchase the OpenAI API from here if your free credit has run out. If you wish to receive additional free credits, you can open a new OpenAI account and receive free API access (up to $5 in free tokens) by providing a new cellphone number. When you run the code, you won’t encounter Error 429 (You exceeded your current quota, please check your plan and billing details).
Finally, don’t divulge or expose the API key to the public. It is a secret key that can only be used to access your account. Additionally, you can generate up to five different private keys and erase API keys.
Develop an AI Chatbot using a customised knowledge base.
Let’s train the AI chatbot now that the software environment has been configured and the OpenAI API key has been obtained. The “gpt-3.5-turbo” model will be used in this case because it is more affordable and quick than other models. You need access to the GPT 4 API, which you can receive by signing up for the waitlist here, if you wish to use the most recent “gpt-4” model. Let’s move on to the instructions now that that is over.
Add Your Documents to the AI Chatbot Training Tool
Make a new folder called “docs” in a visible place, such as the Desktop. If another place suits your preferences, you can pick it. Keep the folder name documents, though.
After that, place the files you want to utilise to train the AI within the “docs” folder. Multiple text or PDF files, even scanned ones, can be added. You can import a huge Excel table as a CSV or PDF file and then add it to the “docs” folder if it is already there. In this tweet from Langchain AI, it is explained that SQL database files can also be added. Other than the ones stated, I haven’t tried many file types; nevertheless, you are welcome to add and test others. I’m including one of my NFT papers in PDF format for this piece.
Please take note that depending on your CPU and GPU, processing a huge document will take longer. It will also efficiently use your free OpenAI tokens. Start with a brief document (30–50 pages or less than 100MB files) to learn the process.
Prepare the Code
Launch Notepad++ or another code editor now, and then paste the code below into a brand-new file. Once more, armrrs on Google Colab was of great assistance to me as I modified the code to make it work with PDF files and added a Gradio interface on top.
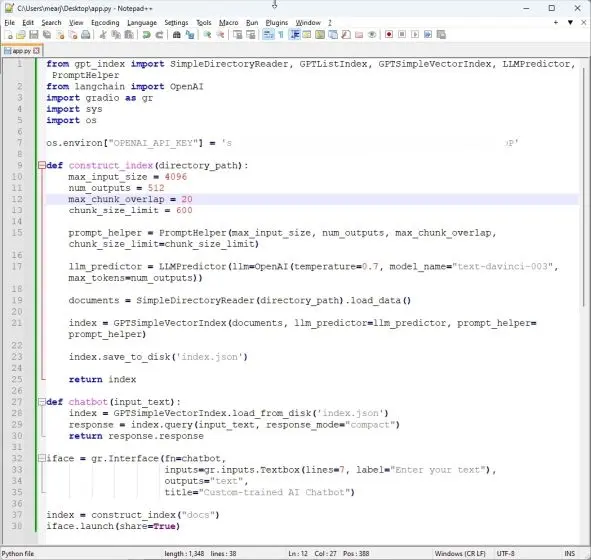
from gpt_index import SimpleDirectoryReader, GPTListIndex, GPTSimpleVectorIndex, LLMPredictor, PromptHelper
from langchain.chat_models import ChatOpenAI
import gradio as gr
import sys
import os
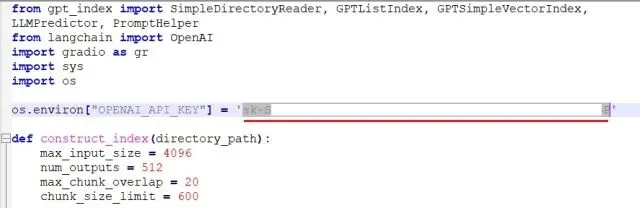
os.environ["OPENAI_API_KEY"] = 'Your API Key'
def construct_index(directory_path):
max_input_size = 4096
num_outputs = 512
max_chunk_overlap = 20
chunk_size_limit = 600
prompt_helper = PromptHelper(max_input_size, num_outputs, max_chunk_overlap, chunk_size_limit=chunk_size_limit)
llm_predictor = LLMPredictor(llm=ChatOpenAI(temperature=0.7, model_name="gpt-3.5-turbo", max_tokens=num_outputs))
documents = SimpleDirectoryReader(directory_path).load_data()
index = GPTSimpleVectorIndex(documents, llm_predictor=llm_predictor, prompt_helper=prompt_helper)
index.save_to_disk('index.json')
return index
def chatbot(input_text):
index = GPTSimpleVectorIndex.load_from_disk('index.json')
response = index.query(input_text, response_mode="compact")
return response.response
iface = gr.Interface(fn=chatbot,
inputs=gr.components.Textbox(lines=7, label="Enter your text"),
outputs="text",
title="Custom-trained AI Chatbot")
index = construct_index("docs")
iface.launch(share=True)
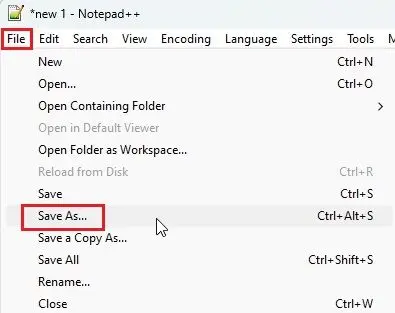
Next, pick “Save As…” from the drop-down menu by clicking on “File” in the top menu.
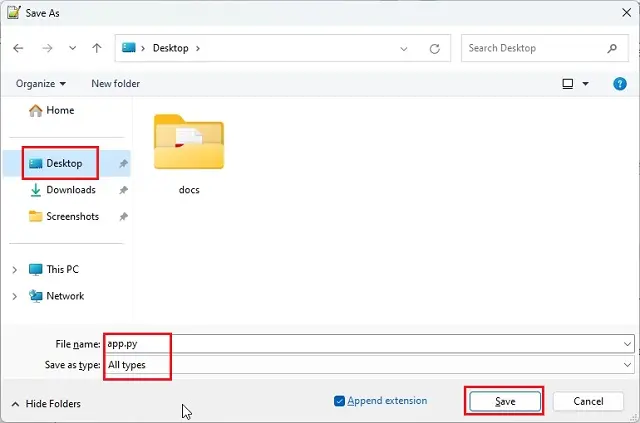
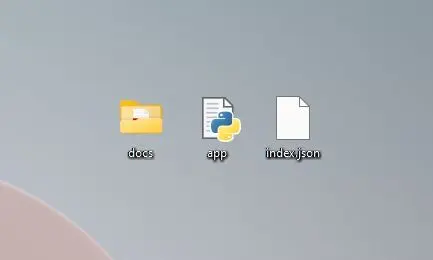
Next, give the file the name app.py and select “All types” as the “Save as type” option from the drop-down menu. Next, save the document to the folder you created for “docs” (in my instance, the Desktop). Make sure that.py is added before changing the name to whatever you want.
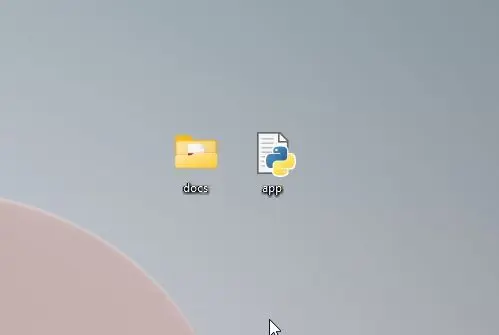
As seen in the screenshot below, confirm that the “docs” folder and “app.py” are in the same location. There won’t be a “app.py” file inside the “docs” folder.
Return to the code in Notepad++ once more. Replace Your API Key with the generated one from OpenAI’s website above in this field.
To save the code, hit “Ctrl + S” at the end. You can now execute the code.
Build an AI ChatGPT Bot Using a Custom Knowledge Base
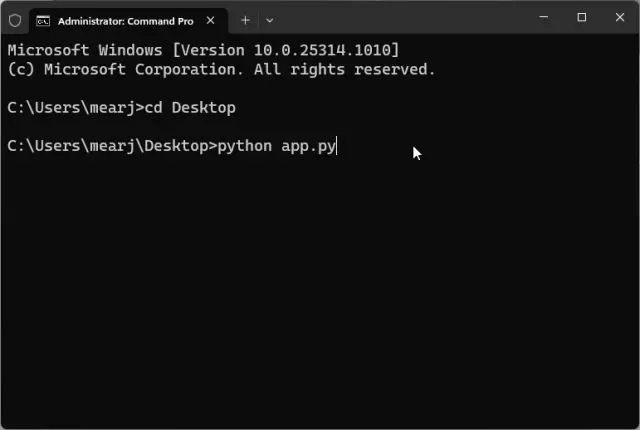
To get to the Desktop, first open the Terminal and enter the command below. The “docs” folder and “app.py” file were saved there. If you stored both items somewhere else, use the Terminal to navigate there.
cd Desktop
Run the command listed below now. Users of Linux and macOS might need to use Python 3.
python app.py
Now it will start indexing the data and begin analysing the document with the OpenAI LLM model. Processing the document may take some time, depending on the size of the file and the speed of your computer. An “index.json” file will be produced on the Desktop once it is finished. Do not be alarmed if the Terminal does not display any output; the data may still be processing. For your knowledge, processing a 30MB document takes about 10 seconds.
Once the LLM has finished processing the data, a local URL will be available. Adapt it.
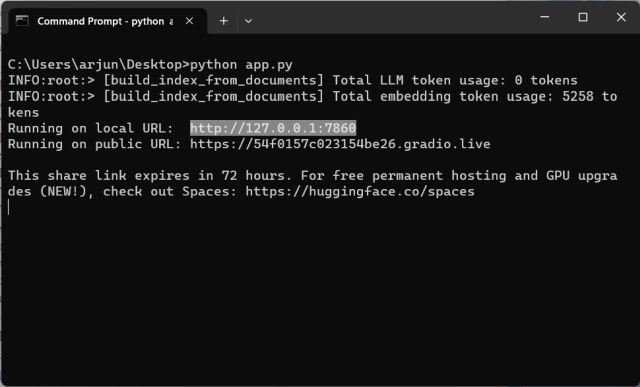
Put the copied URL into the web browser now, and you’re done. Your personalised AI chatbot powered by ChatGPT is prepared. You can start by inquiring about the document’s topic with the AI chatbot.
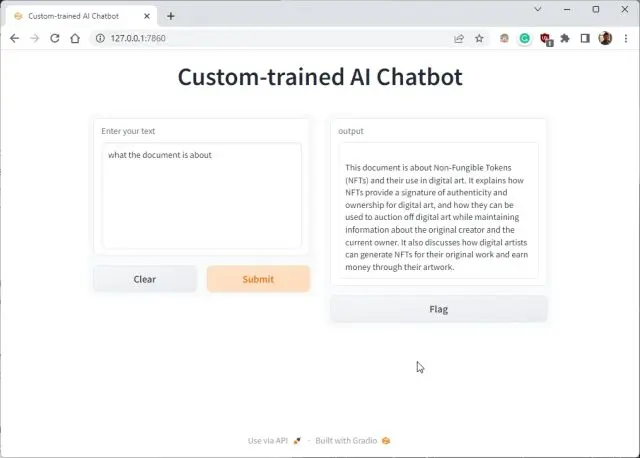
You can continue to ask questions, and the ChatGPT bot will respond using the information you gave the AI. So this is how you can use your own dataset to create a specifically trained AI chatbot. Any type of information can now be used to train and construct an AI chatbot. There are countless options.
Additionally, you can copy the public URL and distribute it to your loved ones. The link will be active for 72 hours, but since the server instance is running on your machine, you must also keep it on.
Press “Ctrl + C” in the Terminal window to end the specifically trained AI chatbot. Click “Ctrl + C” once again if it still does not work.
Just return to the Desktop location and issue the command below to restart the AI chatbot server. Remember that while the public URL will change after each server restart, the local URL will remain the same.
python app.py
Delete the files in the “docs” folder and replace them with fresh ones if you wish to train the AI chatbot with new data. You can also add numerous files, however to achieve a clear answer, be sure you supply clean data.
Run the code once again in the Terminal, and a new “index.json” file will be generated. The old “index.json” file will be automatically replaced here.
python app.py
Visit the OpenAI online dashboard to keep track of your tokens and see how much free credit is still available.
Finally, unless you wish to modify the OpenAI model or the API key for even more customisation, you don’t need to touch the code.